Workspace
Workspaces organize communication by project, department, or team. All workspaces belong to an organization, and members are organized into channels for specific tasks or topics.
Main Workspace Elements
Located at the top of the application interface are the
main workspace elements:

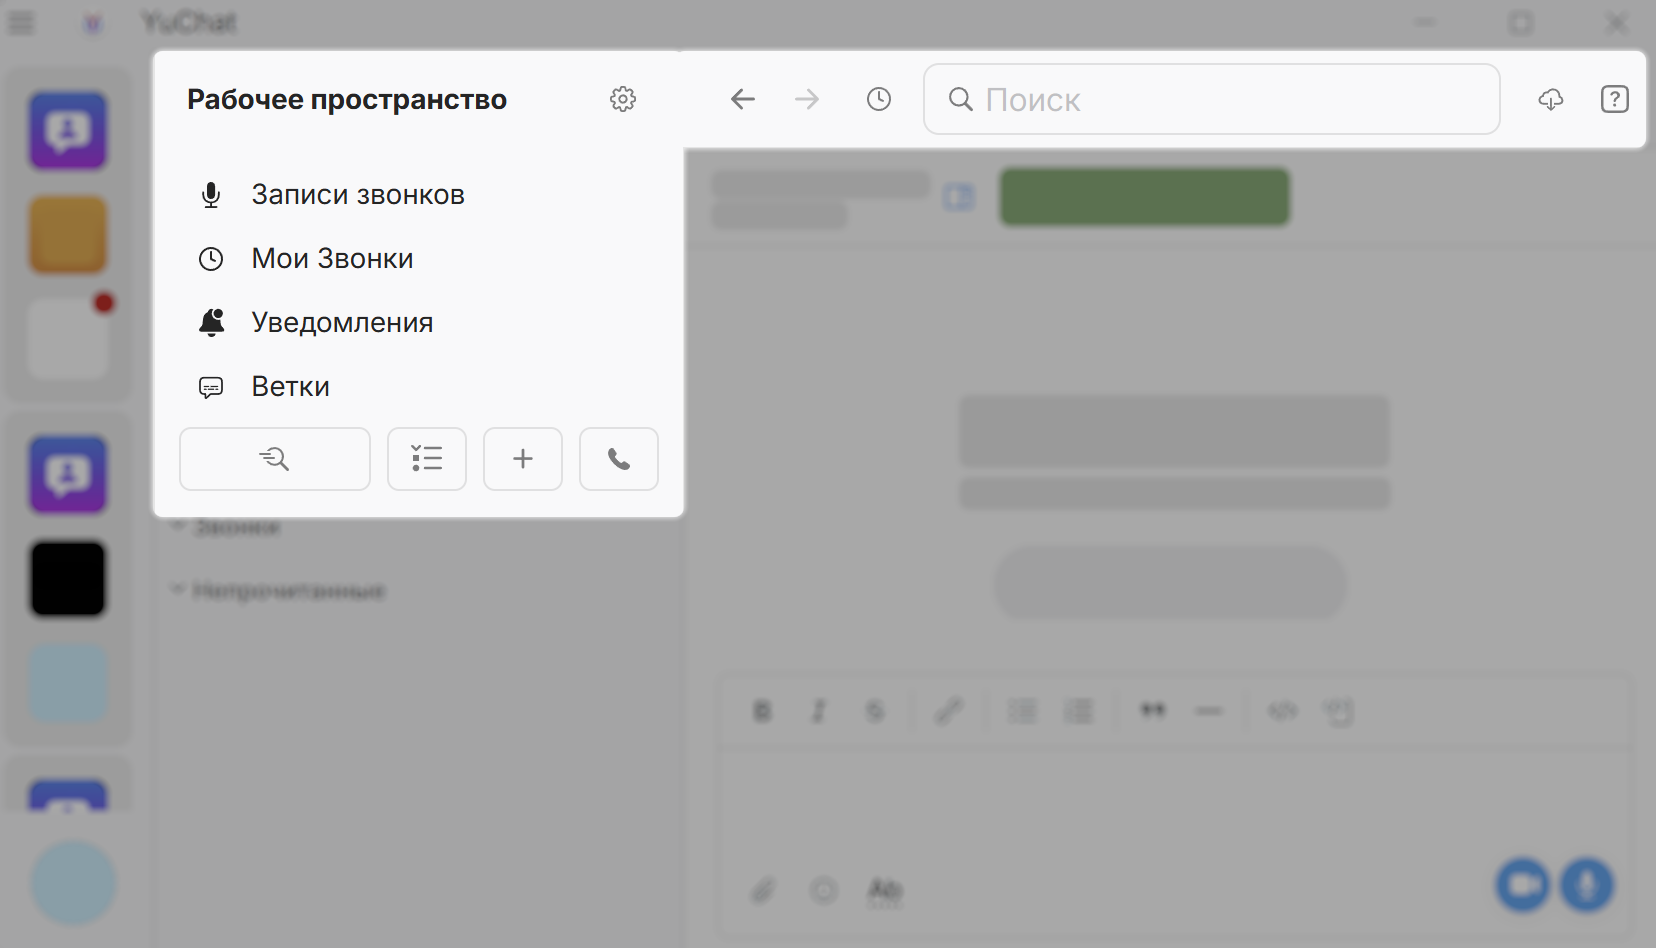
- Main workspace sections
- Quick actions panel
- Workspace settings
- Navigation panel and navigation history
- Search
- Downloads manager
- Application documentation
Main Workspace Sections
-
Call Recordings — Access recordings from:
- Public calls in workspace channels
- Personal or group calls you participated in
-
My Calls — Contains:
- All Calls — call history
- Scheduled Calls — create and manage scheduled calls
- Call by Link — personal call link and call rooms
- Notifications — Messages where you were mentioned
-
Threads — Manage discussion threads
Quick Actions
The Quick Actions panel provides fast access to common tasks:
 Jump To
Quickly find and open any channel or chat. Shows all channels, bot chats, and personal chats with a search bar.
Select a chat to open it instantly
Shortcut: Ctrl / ⌘ + K
Navigate with ↑ ↓ • Open with Enter • Close with Esc
 Channels and Chats
Manage channels, chats, and folders:
- Folders — Organize channels into groups
- Chats — Bot chats (in workspaces) or personal chats (in Contacts)
- Channels — All workspace channels
- Archived Channels — Archived channels
 Add
Add
Quick create:
- New channel
- New folder
In Contacts: Create personal chats and folders
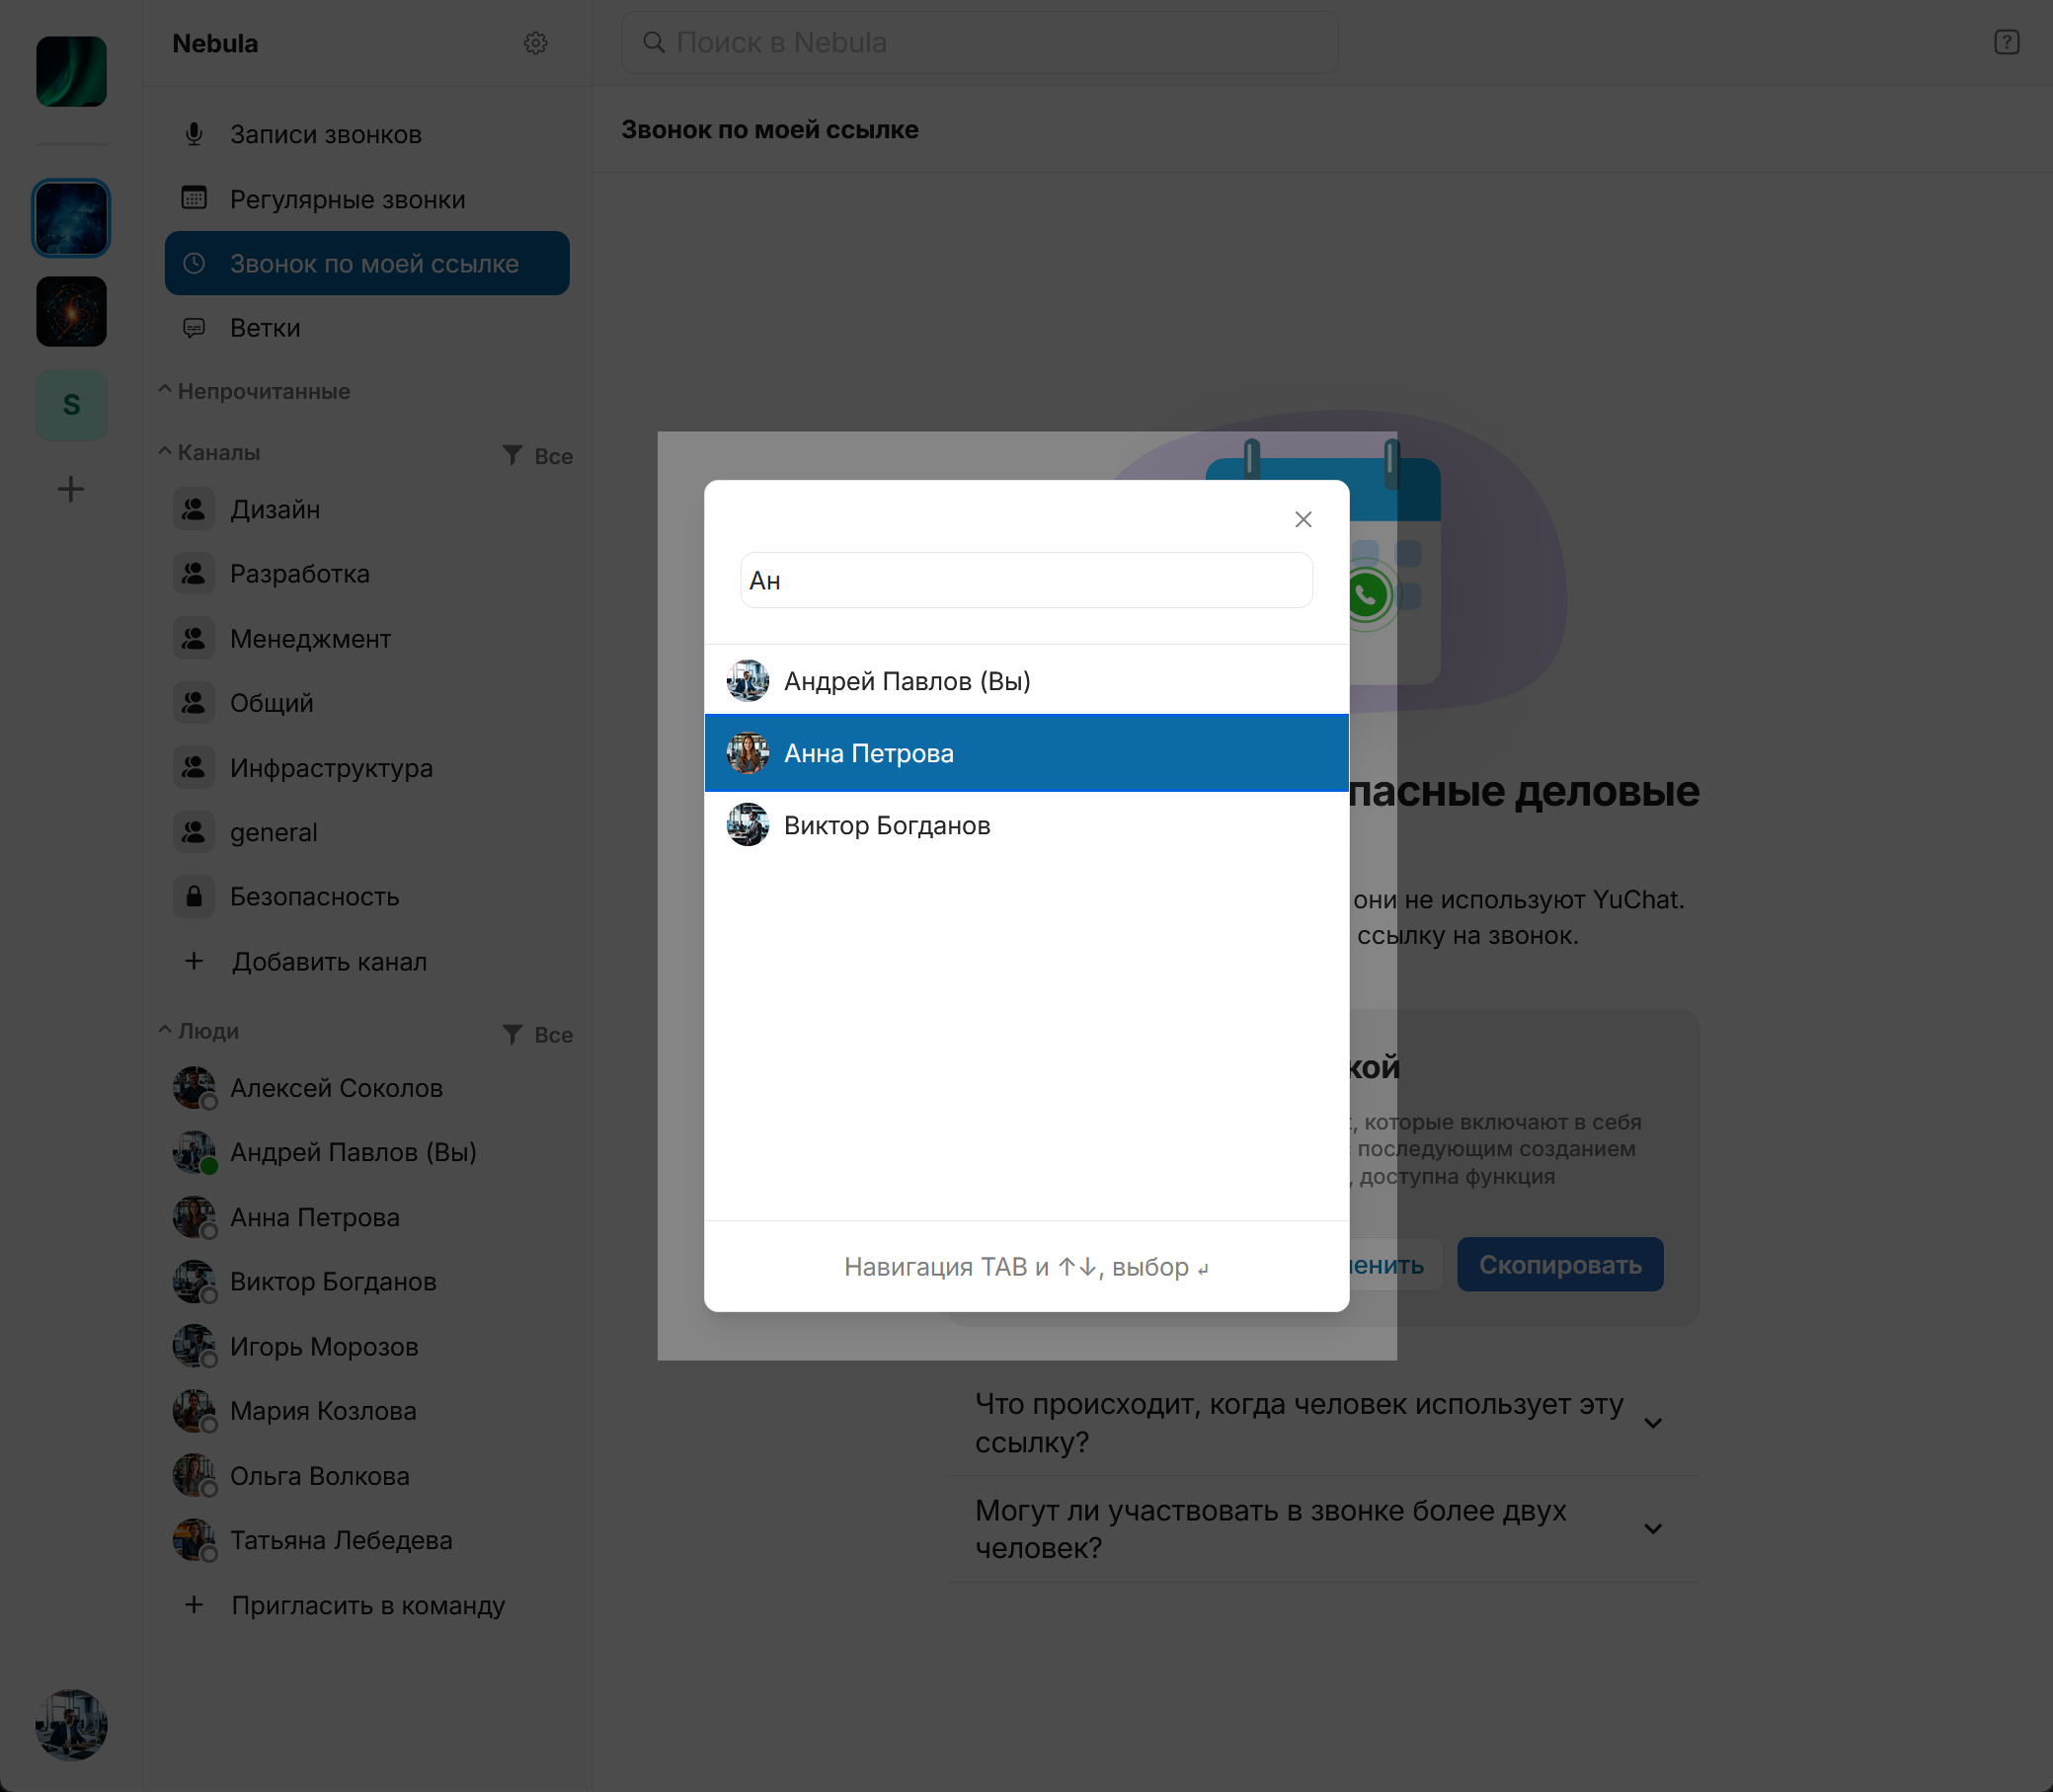
 Start Call
Start a call:
- Select participants
- Create a call room
- Invite colleagues
Keep the navigation panel visible while scrolling: enable Pin workspace navigation panel in Settings.
Unread Workspaces in a Top Section
Enable Show unread workspaces in a top section to add a separate block above the main workspace list for workspaces with unread activity. The main workspace order stays unchanged.
This top block helps you jump back to active workspaces faster without reorganizing your usual sidebar order.
Navigation Panel and History
The navigation panel and navigation history are part of the main workspace elements at the top of the app interface.
Navigation Controls
- ← Back — return to the previous screen
- → Forward — move forward through your navigation history
 History — open the full navigation history
Navigation History
Click History to open a list of recent screens you've visited. The list spans all organizations, workspaces, and their sections.
To use history:
- Click History on the navigation panel.
- Select an entry from the list.
- You're taken straight to that screen.
Navigation history covers your activity across the entire app — not just the current workspace — so you can jump back to any recently visited channel, chat, or section.
Creating a Workspace
All workspaces belong to an organization. When you create your first workspace, Contacts is automatically created.
Organization — A container for workspaces. Users see Contacts and Workspaces, not the organization itself.
During Registration
See Registration and Invitations.
- After registration, the setup wizard opens Create Workspace
- Select an organization or let one be created automatically
- Enter a Workspace Name
- Add a Description
- Click Confirm
Creating Additional Workspaces
If your plan and permissions allow:
- Click + in the sidebar
- Select an organization or create one automatically
- Enter the workspace name and click Create Workspace
- Add participants
After creating a workspace, you can invite colleagues by email or share an invitation link. Separate multiple emails with commas or spaces. You can also skip this step and invite later.
Plan Limits
FREE:
- One workspace per organization
- Upgrade required for additional workspaces
CLOUD Lite:
- Unlimited workspaces
- Any member can create workspaces
- Can create additional organizations (on Free plan)
ENTERPRISE ONPREM:
- Unlimited workspaces
- Any member can create workspaces
- Organization creation may be restricted by configuration
See pricing details
Inviting Members
- Go to Workspace Settings
- Open Invite to Team
Options:
-
Invite by Link — Create a shareable link with expiration: 1, 7, 30 days, or Permanent
-
Invite from Contacts — Select users from your address book. They'll receive an email invitation.
Workspace Settings
Click ![]() next to the workspace name to open settings.
next to the workspace name to open settings.
Workspace settings are now collected in one window with sidebar navigation and search. It includes sections for general settings, notifications, public links, channels, folders, chats, members and invites.
General Settings
Owners and Administrators can:
- Change workspace name and description
- Set or change the workspace logo
- Enable/disable call recording by default
- Allow participants to control recording during calls
- Manage public link creation for:
- Messages
- Call recordings
- Participant invitations
- Guest invitations
Even with public links disabled, members can still invite users by email and share content by forwarding.
Managing Public Links
Control and manage public links created by workspace members.
Not available on the FREE plan.
Per the role model:
- Owners/Administrators — Manage all public links in the workspace
- Members — Manage only their own links
Link categories:
 Messages — Link, message content, author, date, channel
 Call Recordings — Link, recording, author, date, channel
 Links
Links Recurring Calls
 Call Rooms
 Invitations — Link, type, author, date
 Guest Invitations
Quick actions on each link:
 Deactivate
- Copy (or
 from context menu)
  Go to source message
Using the context menu:
- Select a link category
- Right-click a link
- Choose an action
Inviting Participants and Guests
In Invite to Team and Invite Guests, you can:
- Create invitation links (if enabled by workspace settings)
- Invite by email
- Invite members and guests from the organization address book
When inviting guests, select which channel they'll join. Guests can only communicate with members of that channel.
Managing Members
All members can view the participant list in Participants.
Administrators can also:
-
Remove members:
- Select the member and click

- Confirm with Remove Participant
- Select the member and click
-
Change roles:
- Select the member and click

- Choose a role and click Change Role
- Select the member and click
Workspace Notification Settings
Workspace notification settings let you quickly decide which events should notify you across the whole workspace.
To open them:
- Right-click the workspace icon in the sidebar.
- Select Notification Settings.
In this window you can:
- choose which events trigger notifications:
- new messages
- reactions to your messages
- personal mentions
- @channel and @here mentions
- incoming calls
- mute notifications for the entire workspace
- mute notifications for a period: 1 hour, 8 hours, 24 hours, 1 week, or until you turn them back on manually
YuChat plays sounds only for allowed events. If a specific channel is not configured to notify about all messages, you will not hear a sound for every new message there.
For a specific channel, you can fine-tune the rules in Notification Settings.
Leaving a Workspace
- Click
 next to the workspace name
 - Select Leave <Name>
- Click Leave
You can only rejoin by invitation.
Managing Content
View and manage folders, channels, bot chats, and archived channels from the Channels and Chats ![]() panel in Quick Actions.
panel in Quick Actions.
- Folders — Edit or delete folders
-
Chats — Bot chats (or personal chats in Contacts)
tipShortcut: Ctrl / ⌘ + Shift + E
-
Channels — All channels with search
tipShortcut: Ctrl / ⌘ + Shift + L
-
Archived Channels — View or restore archived channels
-
View: Open an archived channel
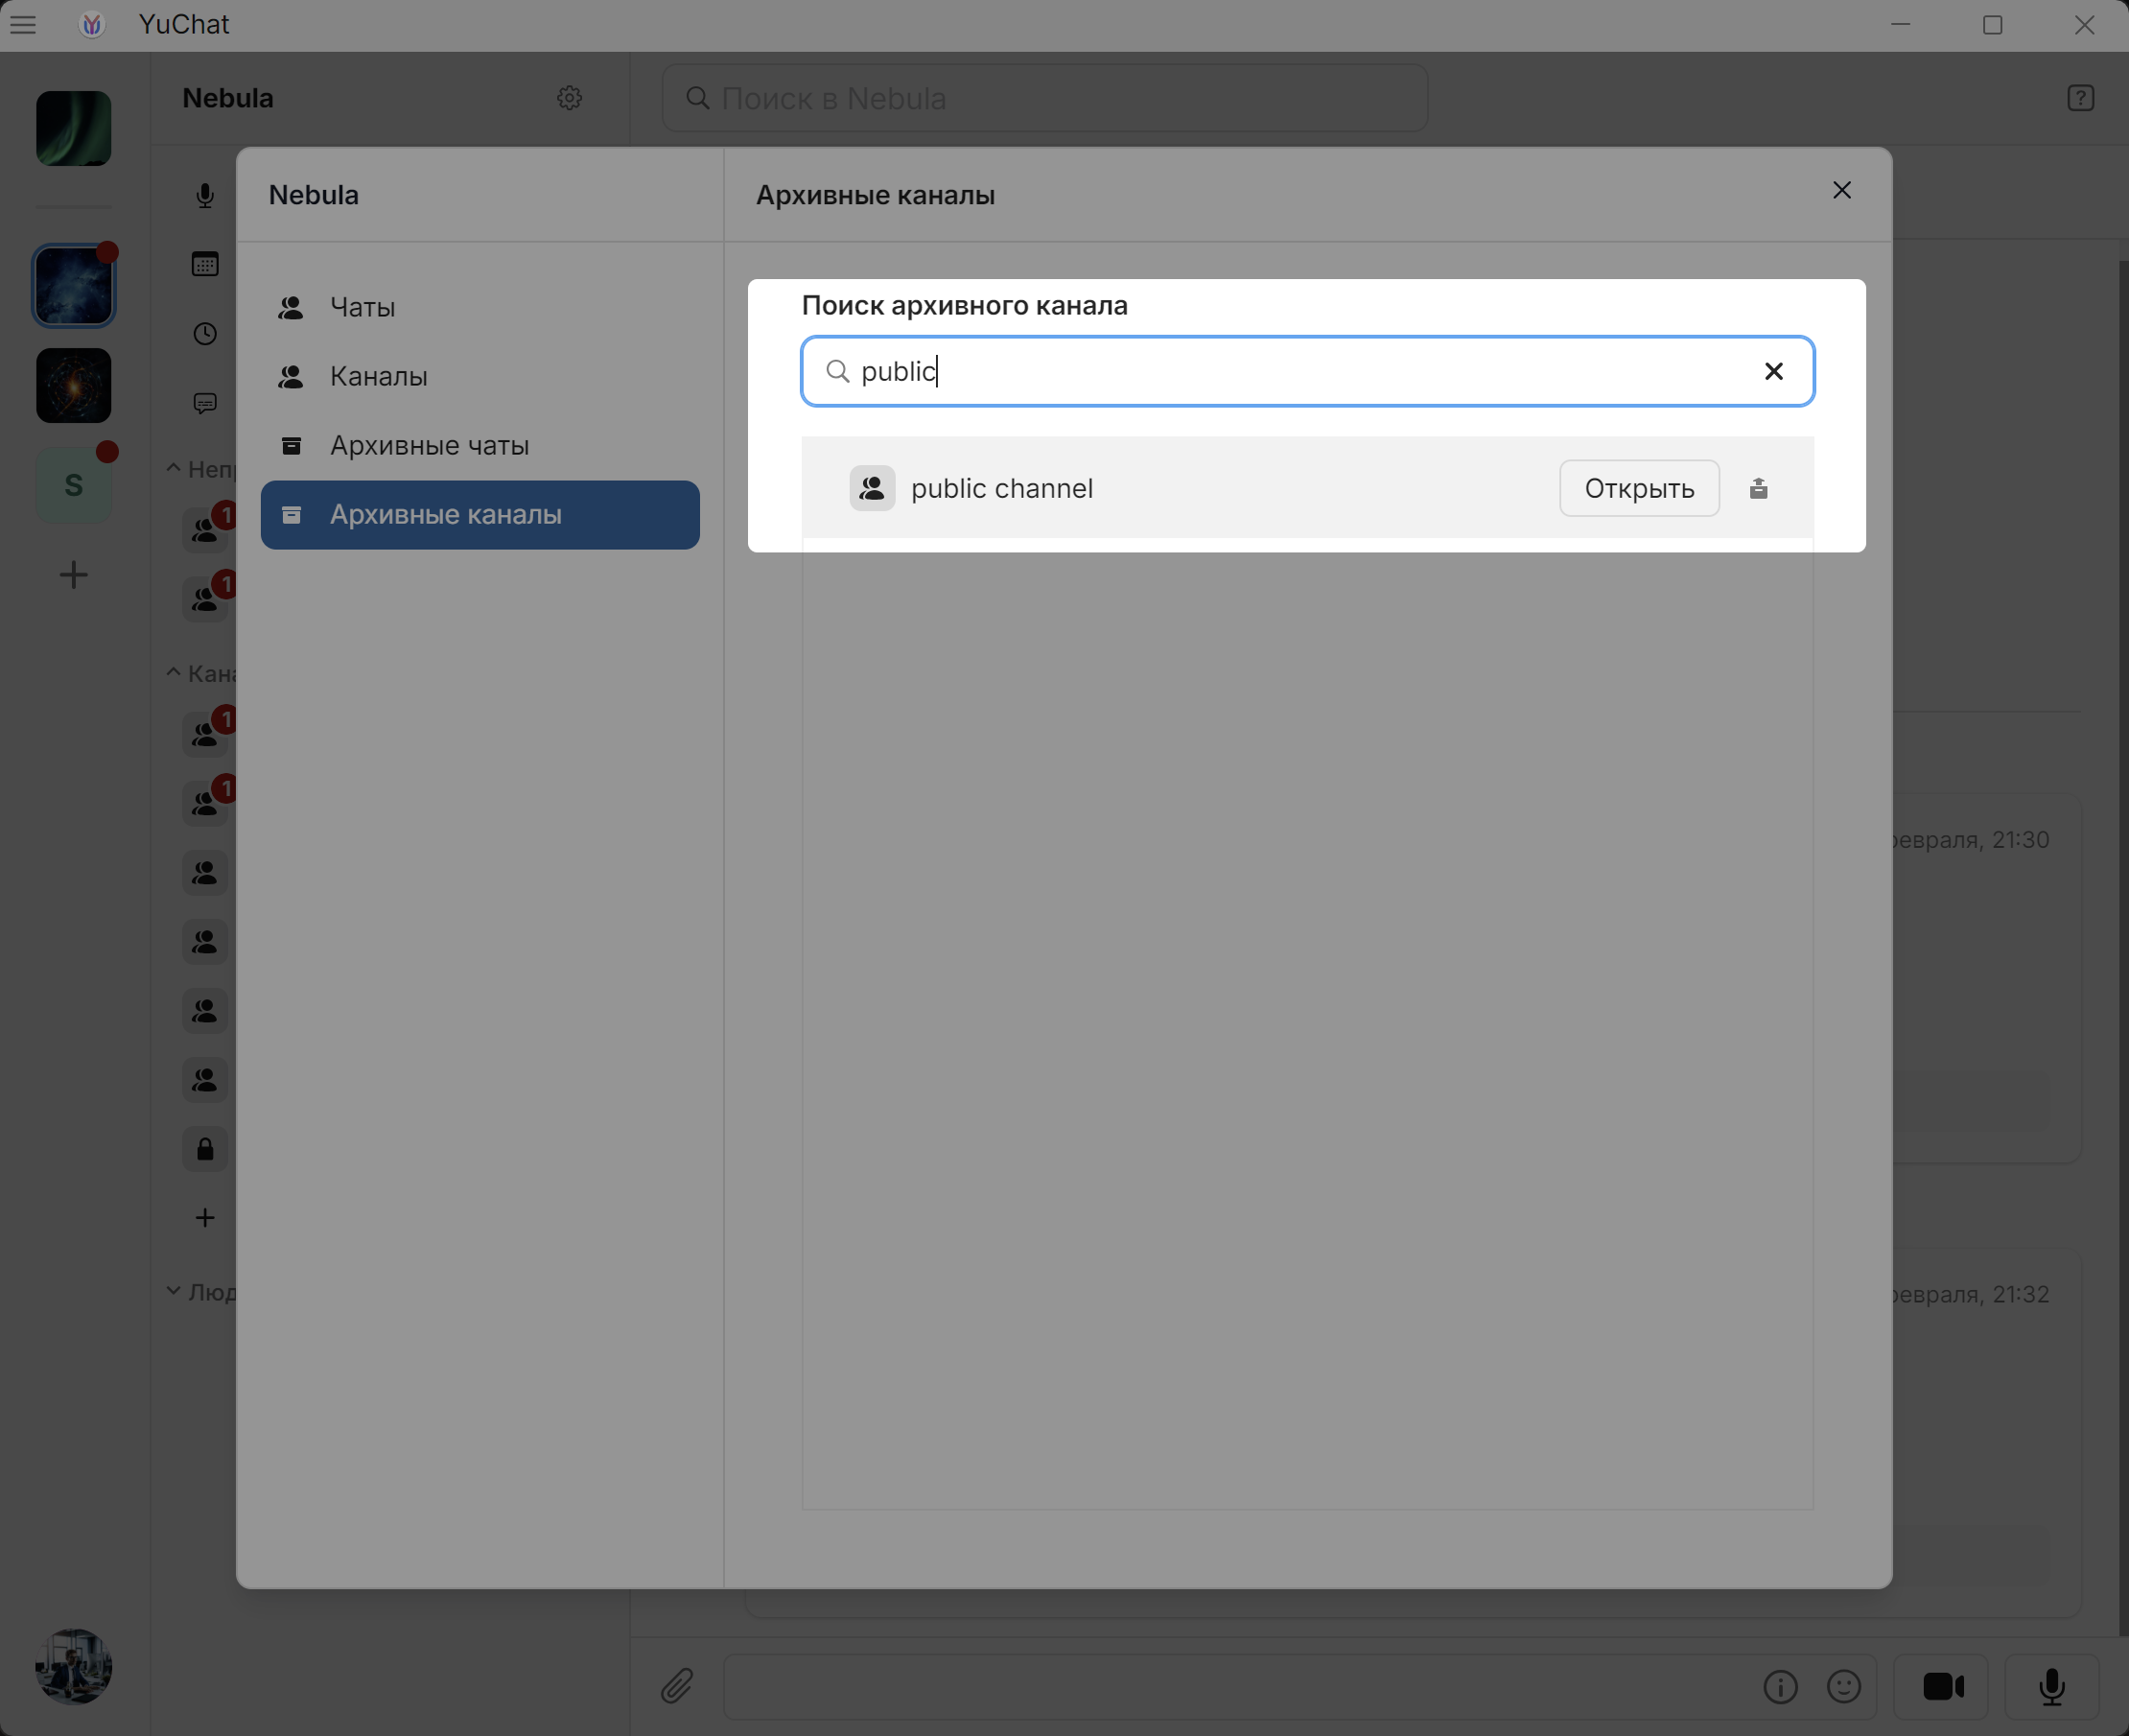
-
Restore: Owners and Administrators can restore archived channels
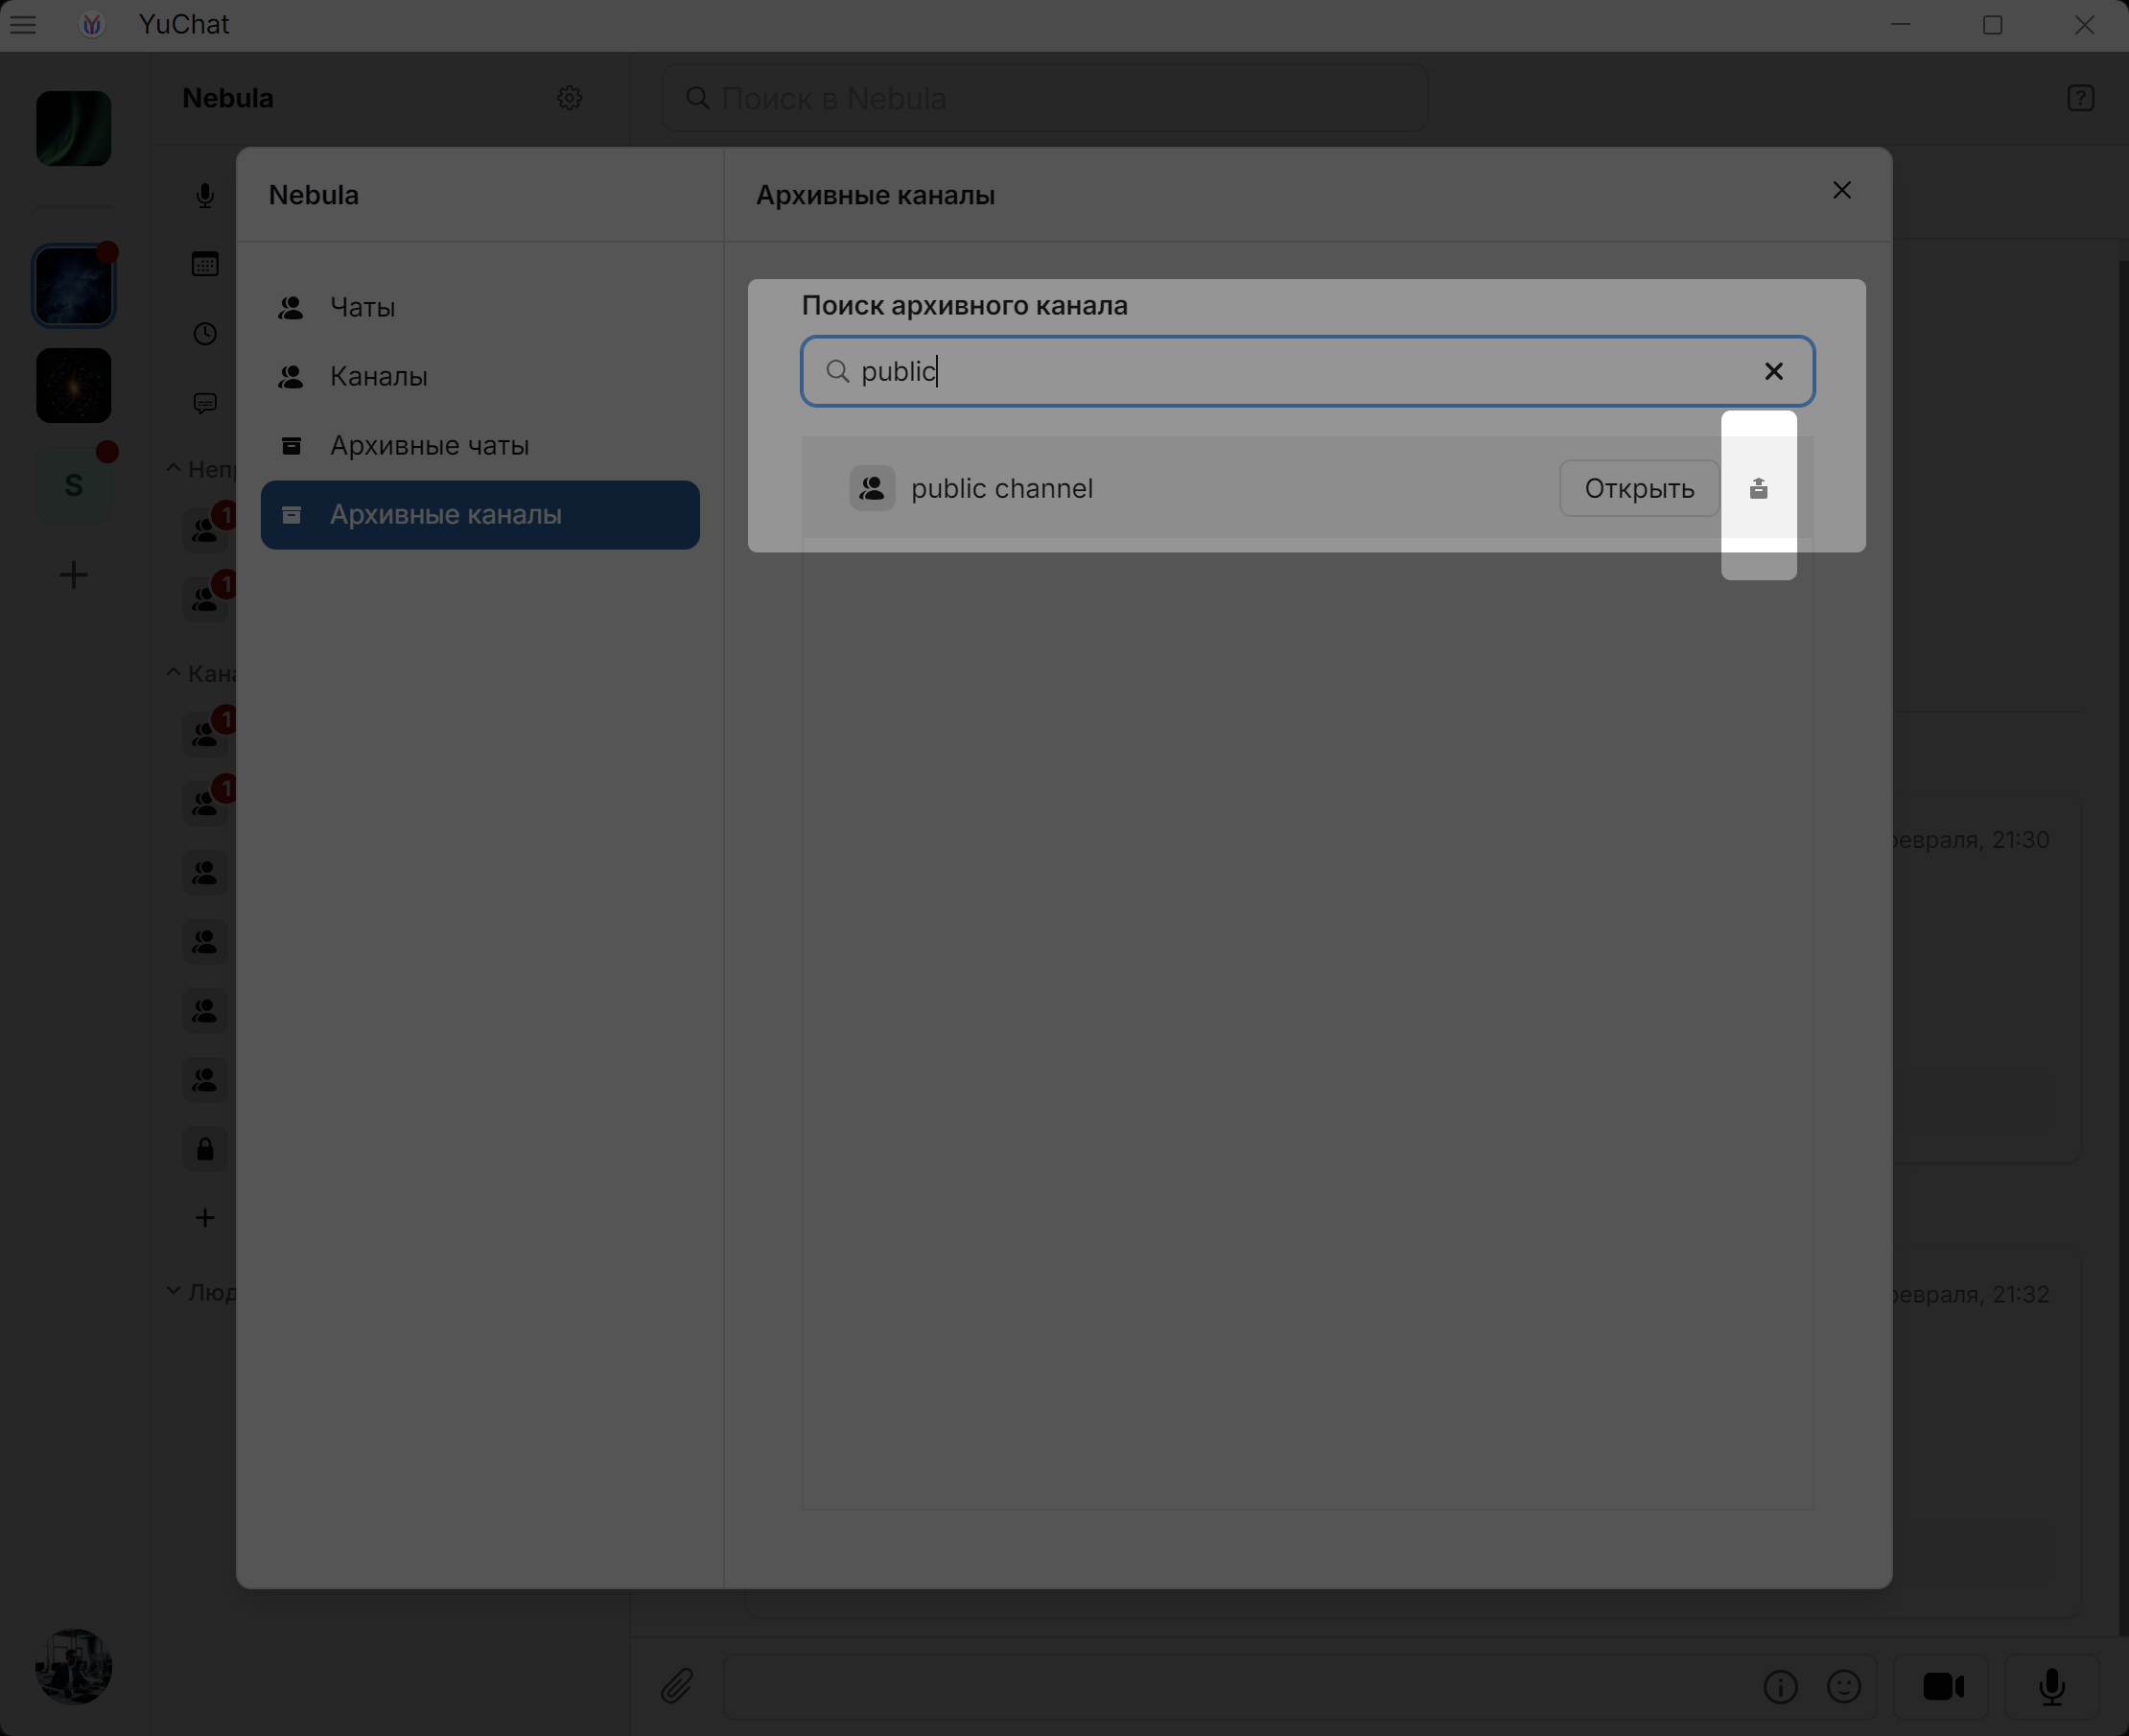
-
Owners and Administrators see all archived channels but can only view those they participated in.
Downloads
The downloads manager is part of the main workspace elements at the top of the app interface.
The downloads manager tracks and manages files you've downloaded in the desktop app.
Open it in two ways:
- Via Application Menu → Navigation → Downloads
- Via
 in the top-right corner of the main app window
Right-click any file for these actions:
- View the list of downloaded files
- Open the file
- Open the containing folder
- Remove the file from the list
The same actions appear on hover when Show context menu on hover is enabled in settings.