Outlook Plugin
Outlook Add-in
Overview
The YuChat add-in for Microsoft Outlook lets you create YuChat call rooms directly from your email client when scheduling meetings.
The plugin is supported on Outlook on the web (OWA), Outlook for Windows, and Outlook for Mac (both Legacy/Classic and New).
Getting the Manifest
The manifest is an XML file Outlook uses to locate and load the add-in. Request the manifest distribution from the YuChat team or via YuChat Support, then save it locally — for example, in a yuchat-outlook-add-in folder.
The domain referenced in the manifest must serve the built assets (taskpane, JS, icons) over HTTPS with a trusted certificate. Outlook rejects self-signed certificates.
Outlook on the Web (OWA)
Works for any account using outlook.office.com.
- Open https://outlook.live.com/mail/inclientstore (alternative link: https://aka.ms/olksideload).
- Sign in with the Microsoft 365 account that needs the add-in.
- Select My add-ins → Custom add-ins → + Add a custom add-in → Add from file…
- Pick the manifest XML file and confirm the trust prompt.
- The add-in appears when you compose a new meeting or calendar event.
Add-ins sideloaded via OWA sync to desktop Outlook on the same account, usually after a full client restart (Cmd+Q or Quit). This is often the easiest path on both Windows and Mac.
Outlook for Windows
From the Ribbon
-
Open Outlook and sign in with the account that needs the add-in.
-
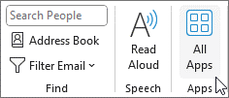
On the ribbon, go to Home → All Apps. If your Outlook uses the simplified ribbon, click the ellipsis ( ... ) on the ribbon and select All Apps.
 note
note- Starting with Outlook for Windows version 2303 (build 16215.10000), All Apps replaces Get Add-ins on the ribbon for managing installed add-ins and accessing the Office Store. On earlier Outlook versions, you'll see Get Add-ins instead.
- If All Apps isn't on the ribbon, your administrator may have disabled add-ins for your organization.
-
Depending on your Outlook version or account type, click Add Apps or Get Add-ins.
tipIf neither Add Apps nor Get Add-ins is available, open the Outlook add-ins page directly: https://outlook.live.com/mail/inclientstore (Source: learn.microsoft.com)
-
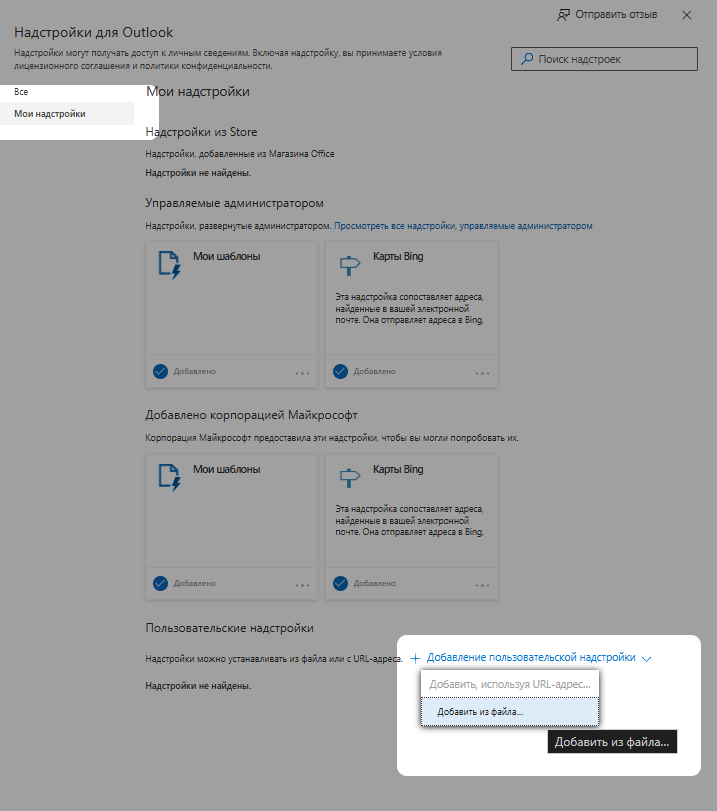
In the Outlook Add-ins window, open the My Add-ins tab.
-
At the bottom of My Add-ins, click Add Custom Add-in → Add from File.
-
Select the manifest XML file.
-
Click Install.
-
Restart Outlook.
Via Microsoft 365 Admin Center (For Admins)
To deploy the add-in centrally to users in your organization:
- Go to Microsoft 365 Admin Center → Settings → Integrated apps → Upload custom apps.
- Choose Office Add-in and upload the manifest XML file.
- Assign the add-in to the target users or groups.
- Users need to sign out and back in for the add-in to appear.
Outlook for Mac
A. Via OWA (Recommended)
Works for both Legacy/Classic and New Outlook for Mac.
- Follow the steps in Outlook on the Web (OWA).
- Quit Outlook for Mac completely with
Cmd+Q(don't just close the window). - Reopen Outlook and wait 30–60 seconds while the client syncs the add-in list from the server.
- Create a new calendar event — the YuChat button should appear on the ribbon.
B. Legacy/Classic Outlook for Mac — WEF Folder
Only works in Legacy/Classic Outlook for Mac, not in New Outlook for Mac.
- In Finder, open Go → Go to Folder… (or press
Shift+Cmd+G). - Paste this path:
~/Library/Containers/com.microsoft.Outlook/Data/Documents/ - If there's no
weffolder, create one (right-click → New Folder →wef). - Drag the manifest XML file into
wef/. Optionally rename it to something recognizable, such asyuchat-schedule-call.xml. Enter your macOS password if prompted. - Quit Outlook (
Cmd+Q) and reopen it.
C. New Outlook for Mac
New Outlook for Mac doesn't include an in-app add-in manager and relies on OWA. Use the A. Via OWA path.
You can tell which mode you're in via the toggle in the top-left of the Outlook window (New Outlook vs Legacy Outlook).
Using the Plugin
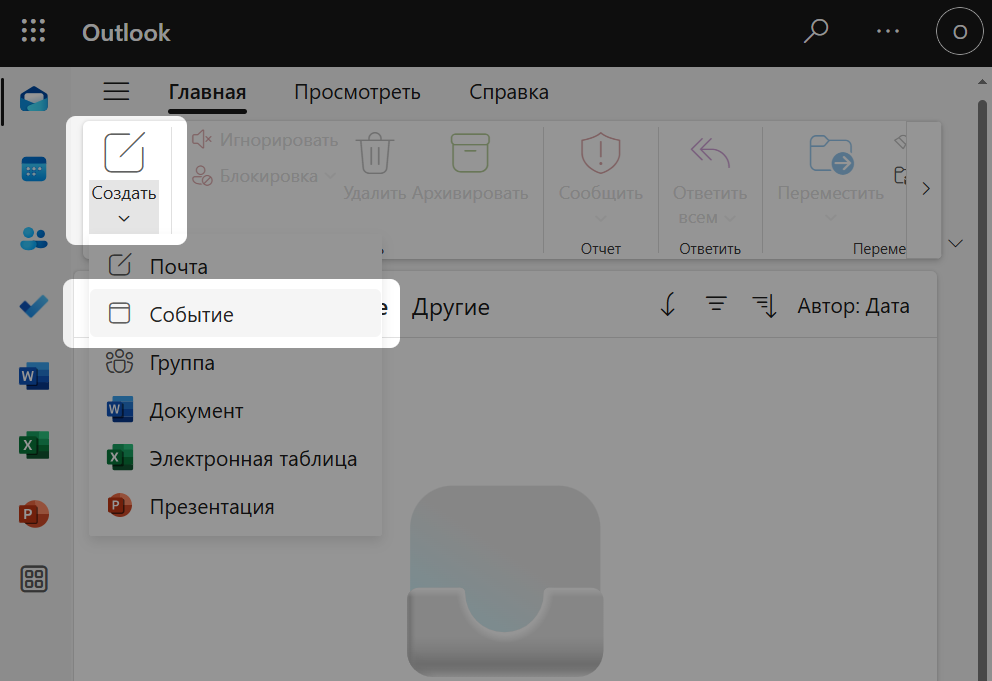
- In Outlook, click New → Event on the Home tab.
- In the new event window, click YuChat for Outlook on the top toolbar and sign in to YuChat in the dialog that opens.
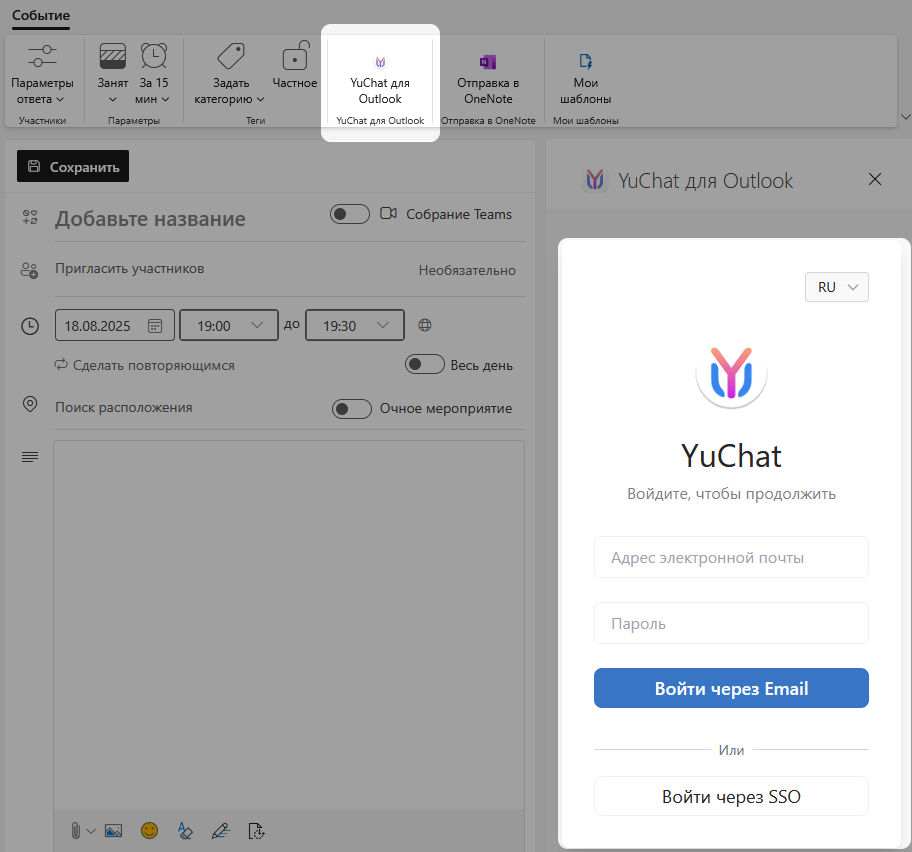
- Choose the workspace where the call room will be created.
- Enter a name in the Call Name field.
- Set Call Visibility to
PublicorPrivate. - Set Call Link Valid For to
Unlimited,1 day,7 days, or30 days. - Set Who Can Access the Call to define who can join.
- Click Create.
The call room is created in YuChat and attached to your Outlook event.
Verifying the Install
- Compose a new meeting or calendar event — the add-in shows up on the meeting compose ribbon.
- Click the YuChat Schedule Call button.
- The add-in task pane opens on the right.
Updating to a New Version
Outlook caches add-in manifests and assets aggressively. To pick up a new version:
- Request the latest manifest from the YuChat team or via YuChat Support.
- Re-upload the manifest using any of the methods above (OWA, the Outlook ribbon, or the Admin Center).
- Fully quit Outlook (
Cmd+Qor Quit) and reopen it.
Troubleshooting
- The YuChat button is missing from the ribbon. Make sure the ribbon is expanded (the
^icon in the upper-right corner of the event window) and confirm you're in a new meeting compose window, not an existing one. - Manifest rejected on upload. The manifest must be served over HTTPS with a trusted certificate. Outlook refuses self-signed or expired certificates.
- "Operation not permitted" when copying to
~/Library/Containers/...on Mac. Use the Finder method (see Legacy/Classic Outlook for Mac — WEF Folder) or grant Terminal Full Disk Access in System Settings → Privacy & Security → Full Disk Access. - Stale UI in Outlook. Fully quit Outlook (
Cmd+Q) and reopen. In OWA, you can also remove the entry from My add-ins and re-add the manifest. - Manifest parse errors on Mac. Open
Console.appand filter logs byOutlook— the client logs manifest validation errors at startup. - The add-in disappears after Mac wakes from sleep. Outlook for Mac sometimes loses the WEF folder registration. Re-copy the manifest into
wef/and restart Outlook.